The DJ/FillerTunes Console may be utilized to host DJ quality dance sets and/or provide unattended operation of "between performances" filler onscreen videos and audio.
By activating the "AutoPlay" feature, Video and Audio selections will automatically fade in and fade out between performances, thus eliminating the dreaded "Dead Air"!
| · | To launch the DJ/FillerTunes Console, simply click the "DJ/FillerTunes Console" button found on the "Toolbar" of the Main Screen.
|
The following dialog will appear...
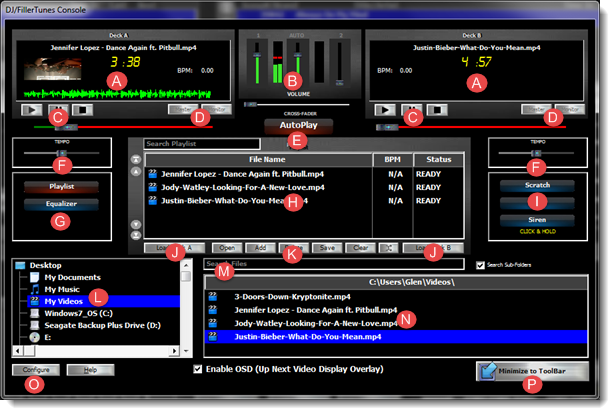
Touring the DJ/FillerTunes Console...
(A) - Visual Performance Display
(B) - Volume Controls - Here you may control the separate deck volumes while in "Manual" mode or control the "Max Volume" while in "AutoPlay" mode.
(C) - Playback Buttons - These buttons may be used to START, PAUSE and STOP Playback while in "Manual" mode. While operating in "AutoPlay" mode you may immediate initiate launch playback of the next "ON DECK" selection by clicking the corresponding "PLAY" button.
(D) - Audio destination selector. - If you have a separate MONITOR audio device configured ("Main Menu->System Devices and Options->Audio Device Setup") you may use these buttons to switch back and forth between them.
(E) - AutoPlay Activation Button - After you've populated your Playlist (H) with your desired Video and/or Audio selections simply click this button to activate "AutoPlay". Once activated, your selections will automatically fade in and out between Karaoke performances. You may "Minimize (P)" the DJ/FillerTunes Console and the AutoPlay will continue unattended.
(F) - Tempo Adjustment - Utilize these sliders to adjust the playback tempo of ongoing "audio" selections. NOTE: Tempo adjustment is NOT available during playback of Video selections.
(G) - Playlist/Equalizer Selectors - Used to toggle between Playlist and Equalizer displays.
(H) - Playlist Window - Here you may manage your playlist. Add selections to your playlist by "dragging and dropping from the file selections (N)" or click the "Add (K)" button. Right-click your mouse within the Playlist window to pre-scan your selections for playback compatibility.
(I) - Sound Effects - Utilize these buttons to add simple "audio-over" sound effects to the ongoing selection.
(J) - Load Deck Buttons - Immediately load a selection into the corresponding deck for playback. Once loaded you may initiate immediate playback of the selection by clicking the corresponding "Play" button (C).
(K) - Playlist Management Buttons -
| OPEN - Load a previously saved Playlist
|
| ADD - Add selections to your Playlist
|
| DELETE - Delete selections from your Playlist
|
| SAVE - Create/Save playlist selections for later recall using the OPEN button
|
| CLEAR - Empty the Playlist
|
| RANDOMIZE - Randomize the Playlist
|
(L) - Drive/Folder Selector - Select the Drive/Folder where your Audio/Video selections are stored in to populate the "File Selections Window (N)".
(M) - File Search - Rapidly locate a selection by entering your Search Text and clicking "Search".
(N) - File Selections Window - Rapidly search for and "Drag" video/audio selections from this list directly into your Playlist (H).
(O) - Configure - Click this button to configure the DJ/FillerTunes Console. (See "Configuring the DJ/FillerTunes Console" below)
ADDING SELECTIONS TO YOUR PLAYLIST
1. Using the Drive/Folder Selector (L), select the Drive/Folder location that your Audio/Video selections are stored in.
2. Drag your selections from the File Selections Window (N) and drop them directly into your Playlist (H).
3. Optionally you may also utilize the "Add" button (K). Simply locate and add your selections using the popup file selector.
SAVING YOUR PLAYLIST
1. After populating your Playlist with the desired selections simply click the "SAVE" button (K).
2. Select the desired Drive/Folder location and provide a "Filename" for your new Playlist File.
RECALLING/LOADING A PREVIOUSLY SAVED PLAYLIST.
1. Click the "OPEN" button (K).
2. Locate the previously saved Playlist File and click "OPEN"
LAUNCHING AUTOPLAY
1. Add or load selections into your Playlist (2 or more selections required).
2. Click the "AutoPlay" button (E).
3, Once AutoPlay is underway you may Minimize (P) the DJ/FillerTunes Console. AutoPlay will continue in the background unattended.
OVERRIDING AN AUTOPLAY SELECTION
1. Simply load a selection into the "Non-Playing" deck using the corresponding "Load Deck" button (J)
2. Click the "PLAY" button (C) of the corresponding deck to immediately launch and fade in the selection.
CHANGING THE ORDER OF AUTOMATIC PLAYBACK
1. Reorder the Playlist selections by utilizing the FOUR List Position Controls to the left of the Playlist.
2. Optionally you may randomize the Playlist using the "RANDOMIZE" button (K)
CONFIGURING THE DJ/FILLERTUNES CONSOLE
1. Click the "Configure" button (O).
2. You may configure the following options...
| Time before Karaoke Performance Ends to Start DJ/FillerTunes Fade In (Seconds).
|
| Set to the time (seconds) before the end of an ongoing Karaoke performance that you wish the DJ/FillerTunes selections to start "fading back in".
|
| Dual-Deck Cross-Fading Start from End Time (Seconds)
|
| Set to the time (seconds) before the end of the "Playing" deck selection to launch and initiate "fade-in" of the next "on-deck" selection.
|
| Desired Action After Song Selection Has Played (AutoPlay Only)
|
| Choose how you wish selections handled after playback.
|
| Launch New Filler Song After Each Karaoke Performance.
|
| Activate this option if you wish a new DJ/FillerTunes selection to launch after every Karaoke performance.
|
| Pause FillerTune After Fadeout.
|
| Choose whether you wish the ongoing DJ/FillerTunes selection to PAUSE and RESUME after fadeout/fadein or silently continue in the background.
|
| Turn on MP3 Sentry Scanning of MP3 Audio Files
|
| Activates the CompuHost exclusive MP3 Sentry whereby every MP3 Audio selection is pre-scanned to ensure reliable playback.
|