|
Importing CD+G Tracks from CD+G Discs
| [Previous] [Main] [Next] |
|
|
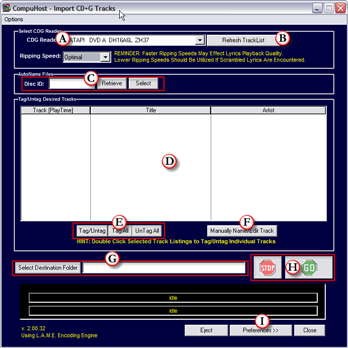
| 1. Take note of the Brand and Manufacture Disc ID of the CD+G Disc you wish to import. (You may use this information in an upcoming step)
|
| 2. Insert the CD+G Disc into the selected CDROM/DVD Reader.
|
| 3. Select the applicable CDROM/DVD using the drop-down list (A).
|
| 4. Click "Refresh TrackList" (B) to refresh the track listing and properly reflect the tracks residing on the inserted CD+G Disc. (See Note)
|
| 5. Select Desired Ripping Speed. (NOTE: OPTIMUM is recommended. Slower ripping speeds often result in higher quality Video Lyrics display.)
|
|
|
|
|
|
|
| CDGRip V3 offers TWO AutoNaming Methods to choose from!
|
| 1. | FastTracks V3 Search - Utilizes the extensive Track Listings (SongBase) available when a registered version of FastTracks V3 SongBook Creator (discontinued) is installed on the system..
|
|
|
| (Figure 1a - FastTracks V3 Search Option)
|
|
|
| NOTE: If the "Retrieve" and "Select" buttons are disabled, a Registered Copy of FastTracks V3 SongBook Creator was NOT found on the system.
|
|
|
| To retrieve the Track Listing utilizing a known Manufactures Disc ID...
|
| 1. | Enter the Manufacturer's Disc ID (A)(Figure 1a)
|
| 2. | Click "Retrieve" (B)(Figure 1a)
|
|
|
| To select the Track Listing utilizing drop-down menu selections...
|
| 1. Click "Select" (C)(Figure 1a).
|
|
|
| The following dialog will appear...
|
|
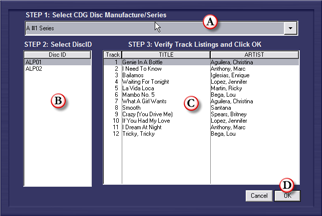
| (Figure 1b - AutoNaming Dialog)
|
|
|
| 2. | Select the CDG Manufacture/Series from the drop down list (A)
|
| (Figure 1b).
|
| 3. | Select the Manufacture Disc Id from list (B) (Figure 1b).
|
| 4. | Verify the Track Listings in list (C) (Figure 1b).
|
| 5. | Once you've located the proper CDG listing, click "OK" (D) (Figure 1b).
|
|
|
| 2. | CDDB Online Search - Functional Internet Connection REQUIRED! The CDDB Online Search feature utilizes the free Online CDDB/FreeDB database to obtain track listing when available.
|
|
|
| (Figure 1c - CDDB Online Lookup)
|
|
|
| 1. | Ensure that you are properly connected to the Internet before proceeding.
|
| 2. | Insert a CD+G Disc into the selected CDROM/DVD Reader.
|
| 3. | Click "Refresh TrackList" (B)(Figure 1)
|
| 4. | Click "CDDB Lookup" (A)(Figure 1c)
|
|
|
| If successful, the track listings will be displayed in the track window (D)(Figure 1)
|
| IMPORTANT! Be sure to review the track listings and edit as necessary!
|
|
|
| In the event that the track listings are not obtained you may either manually name the tracks utilizing the :"Manually Name Tracks" or "FastTracks V3 Search" option if available.
|
|
|
| CDDB WARNING! The CDDB Online Database, although free to use, is extremely prone to erroneous and improperly formatted listings! Extreme care should be taken when utilizing this method of AutoNaming! Be sure to double check ALL information obtained through the CDDB service and manually correct when necessary.
|
|
|
| 3. | Manually Naming Files - You may use this method when unable to utilize one of the AutoNaming Methods. (Custom Discs, Unlisted Discs etc.)
|
| a. | Enter the Manufacture Disc ID (C) .
|
| b. | For each track you wish to import, select the listing from list (D) and click the "Manually Name File" button (F) (Figure 1).
|
| c. | Provide the Title and Artist in the popup dialog.
|
|
|
| It is recommended that an Artist Naming Format of "Last Name, First Name" be utilized where possible.
|
|
|
|
|
| 1. | Tag the tracks you wish imported by double-clicking on each listing in list (D)(Figure 1), or you may Tag ALL listings by simply clicking "Tag All" (E)(Figure 1)
|
|
|
| 1. | Click "Select Destination Folder".
|
| 2. | A Folder Selection Dialog will appear. Navigate and locate the Folder you wish to store your ripped "MP3+G/WMA+G Files" in.
|
| 3. | Click "OK"
|
| IMPORTANT: It is important that the files are NOT moved from this location at anytime after the ripping process. This should NOT be a Temporary Folder.
|
| 1. | Click "GO" (H) (Figure 1).
|
| 2. | The Automated Importation Process will commence. You may monitor its progress via the On Screen Progress Bars at the bottom of the dialog.
|
Repeat the preceding steps for each CD+G Disc you wish to import.
| 1. | Click "Preferences" (I)(Figure 1)
|
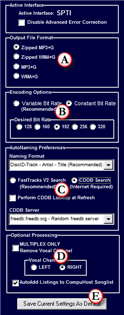
(Figure 2)
| You may choose from FOUR selections.
|
| · | MP3+G: This is an uncompressed format. Selecting this format will result in larger files and less efficient use of hard drive space.
|
| · | WMA+G: This is an uncompressed format. Selecting this format will result in larger files and less efficient use of hard drive space.
|
| · | Zipped MP3+G (RECOMMENDED): This is a compressed format. Resulting files are smaller and utilize less hard drive space.
|
| · | Zipped: WMA+G: This is a compressed format. Resulting files are smaller and utilize less hard drive space.
|
|
|
| Bitrate refers to the compression level of the resulting MP3/WMA Audio file. The lower the BitRate, the smaller the resulting file. However, lower BitRates also result in lower quality audio files.
|
| NOTE: Recommended Setting: Variable BitRate - 75%
|
| 1. | FastTracks V3 Search (RECOMMENDED) - Utilizes the extensive Track Listings (SongBase) provided by FastTracks V3 SongBook Creator (sold separately)
|
| 2. | CDDB Online Search - Utilizes the free Online CDDB/FreeDB Lookup Service. Internet connection required!
|
| Multiplex encoding is utilized on specialized Karaoke tracks. The encoding involves altering the RIGHT channel to include the Lead Vocals for practice purposes. These specialized Karaoke tracks were initially intended for the Home (non-professional) user. However, by utilizing this feature, the resulting MP3/WMA+G files are decoded/standardized, thus perfectly usable in a professional environment.
|
| 1. | Click "Save Current Setup as Default" to save your current settings for automated recall on future ripping sessions
|
|
|